

Your Car Maintenance Guide Made Simple
February 22, 2017 | in Car Maintenance
When it comes to keeping your car running well, there are a few things that are most important. While there are several steps to car maintenance, you’ll want to know at least the essentials and the basics. You’ll want to know how to jump start your car, how to change a tire, and how to change your oil. If you understand these basics, you’ll be well on your way to maintaining a car that runs smoothly and you’ll be prepared for the worst. This brief car maintenance guide will go over the three main things you should know to keep your car functioning at a high level. A defensive driving school online may help you drive more safely, but basic car maintenance is best learned by a little study and a lot of practice. Here’s our simple car maintenance guide with the steps to jumpstarting a car, changing a tire, and changing your oil.
How to jump start a car
1. Get Started
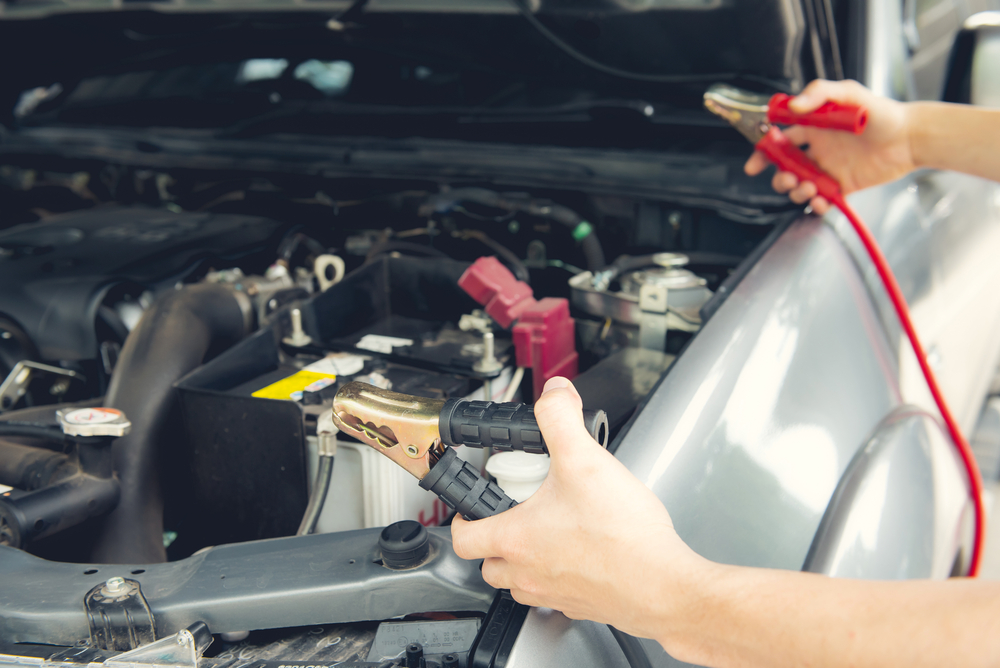
a) Open the hood on each car and locate the battery.
- Most cars will have the battery near the front of the car, on one side or the other. Some cars, however, will position the battery toward the back. Others, yet, will have the battery in the trunk. Check your car’s user manual if you’re unable to locate the battery.
b) Identify the positive and negative terminals
- Positive=Red. Usually marked with a plus sign (+)
- Negative=Black. Usually marked with a minus sign (-)
- Make sure the red and black clamps never touch each other once connected to the batteries. This could cause electricity to arc and damage one or both cars. Do no let the cars touch each other either.
c) Park the working car near the disabled car
2. Turn off the engine, radio, lights, A/C, fans, and all other electrical components in both cars.
3. Connect the jumper cables
- Connect the jumper cables in the following order, making certain you have a solid, clean connection between the cables and the terminals
- One red clamp on the positive (+) terminal of the dead battery
- One red clamp on the positive terminal of the good battery
- One black clamp on the negative (-) terminal of the good battery
- Connect the other black clamp to a piece of grounded metal on the dead car. Look for shiny (not oily or painted) metal attached to the engine.
4. Start the working car and let it idle for a few minutes. Also, rev the engine a little above idle for 30 to 60 seconds.
5. Try to start the vehicle with the dead battery
- If the car doesn’t start, turn the engine off and disconnect the last clamp. Wiggle or twist each clamp to make sure you have a clean connection. Next, restart the car, allowing the battery to charge for another five minutes.
6. Once you’ve successfully gotten the dead car up and running, remove the jumper cables in the reverse order in which you originally attached them, and replace any protective covers on the terminals. Below is the order.
- First, remove the black clamp from grounded metal on the car with the dead battery
- Next, the black clamp from the negative (-) terminal of the good battery
- Third, the red clamp from the positive (+) terminal of the good battery
- Last, the red clamp from the positive (+) terminal of the dead battery
7. Keep the car running, slightly revved, for several minutes and then on idle for about 20 minutes before turning off the engine. This will allow the alternator to provide the battery with enough charge to start again. If it does not, then you may need to replace the battery or have your alternator checked.
How to Change a Tire

1. Loosen lug nuts.
- Remove the hubcap if necessary. Loosen (but do not remove) the lug nuts with the wrench by turning counter-clockwise (to the left).
2. Raise vehicle off the ground with the jack.
- Lift tire about 6 inches off the ground. See the owner’s manual for specific location of the jack and where to place it on your vehicle. (Location is different depending on your car model).
3. Finish removing lug nuts and remove tire from car by pulling straight toward yourself.
4. Line up the holes in the spare with the lug nut posts and push all the way onto the wheel base until the wheel can go no further.
5. Replace and hard-tighten the lug nuts, just enough to temporarily secure the spare.
6. Lower the car back to the ground and remove the jack.
7. Finish tightening the lug nuts.
- Start with one lug nut and tighten it about halfway with the wrench. Next, move across the circle and tighten the opposite nut to about the same tightness. Continue until all lug nuts are tightened about halfway, making a sort of star pattern. Repeat until you tighten each lug nut as tight as possible.
8. Place the old tire and all tools in your trunk, making sure to leave nothing on the side of the road.
How to change your oil

Necessary tools
New oil (see user manual for type and quantity)
New oil filter (see user manual for type)
Pan and newspaper to catch draining oil
Socket wrench
Flashlight
Metal or plastic oil-fill funnel
Safety goggles and gloves
1. Drain the oil
- Drain the oil. Run your car for about two or three minutes to warm up the oil. You will want your car off when you change the oil, but this will churn it up and allow it to drain more quickly.
- Lift your car using either a jack or ramps
- Remove the oil cap on top of the engine to allow easier drainage
- Find the oil pan and place it with a few newspapers beneath it to catch the oil.
- Locate a flat metal pan under your car. It will be closer to the engine than the transmission and will have a bolt or plug toward the bottom, which you will remove to drain the oil. If you can’t distinguish the oil pan from the transmission pan, it should be warm to the touch after running for a few minutes, while the transmission won’t be.
- Remove the oil plug, turning counterclockwise with the socket wrench. Wait for the oil to drain. (This will take several minutes).
- You should also remove and replace the circular drain plug gasket (made of paper or felt), though you can reuse a metal washer if it’s in good condition.
- Replace the oil plug, first hand-tightening to ensure you are not cross-threading, then finishing with the socket wrench.
2. Replace the oil filter
- Replace the oil filter. Locate the filter assembly. The location of the filter on the engine is different on different model cars. Use the new filter you purchased as a reference for what you’re looking for. The typical filter is a white, blue, or black cylinder about 4 to 6 inches long and 3 inches wide -about the size of a soup can.
- Unscrew the oil filter, making sure to also remove the rubber gasket ring. There will be some oil still trapped in the filter that may spill when you unscrew it.
- Dip the tip of your finger in some of the new oil and smear it on the gasket ring of the new filter to lubricate it and help create a good seal on the new filter.
- Screw on the new filter, making sure not to cross the threads. (See the packaging for how tight).
3. Add new oil
- Add new oil to the engine using a funnel where you previously removed the fill cap. If you hold the bottle with the spout on top, it will pour more smoothly, without bubbling.
- Start the engine. With the car in neutral or park, check for any leaks or drips. Make sure the oil pressure light goes off after starting the car. Let the engine run for a minute or so to get oil pressure up and make sure you have installed everything properly.
4. Dispose of old oil
- Transfer the oil to a container you can seal. Avoid putting oil in containers that previously held chemicals such as bleach, pesticides, paint, or antifreeze, or you will make it unrecyclable. Add any oil still in the old filter to the old oil.
- Take oil to a designated collection site. The place you bought your oil should be able to tell you where this would be. Also, retailers that sell over 1,000 filters per year are required to accept old filters for recycling.
5. Tips to follow
- Consider having an oil absorbent product available in the event of spills. This will absorb oil ann can help keep your garage and driveway clean. Kitty litter or clay-based products are not effective solutions for this. You can find a wide variety of eco-friendly, oil absorbent products online. They are extremely absorbent, easy to use, and renewable.
- Try using recycled oil. Used motor oil can be recycled by refining it until it meets the same requirements as new oil. In some cases, it can cost less too. You can replace your normal drain pan bolt with an oil drain valve. These can give you more control as you drain the oil, reduce the amount of oil that spills, and make oil changes more convenient.
6. Warnings
- Do not confuse the oil inlet with the transmission fluid inlet. If you put oil in your transmission, you can ruin it, requiring an expensive replacement.
- Remember, even after you have turned the ignition off, the engine, the oil inside of it, and other parts of the car can still be hot for a long time. Be careful not to burn yourself, and use proper safety gear.
← How do you drive stick? | How to Keep A Clean Driving Record →

